
Tutorial done with the beautiful Free Scrap LIFE IS BUT A DREAM, scrap kits fromScraps Dimensions, Doris Lynch, you can find it HERE
I have used an image from Elias Chatzoudis www.elias-design.gr you can find his tubes in www.mypsptubes.com
Additional material (masks) HERE
Start:
1-Open an image 700x700, resize FRAME1 600x600, paste into your new layer.
2-Open PAPER4 and apply the mask WSL_mask181 paste behind the frame as a new layer.
3-Open PAPER5 and paste as a new layer benind the mask and erase what is left over.
4-Open the FLOWER2 tube and resize, paste as in the drawing, the same with the blue bow and erase what is left over.
5-Paste as a new layer the girl tube and the little sign, layers merge visible, apply drop shadow.
6-Open PAPER2 and apply the mask WSL_Mask120, merge group, paste as a new layer behind the drawing.
7-With the same paper again we apply this time mask WSL_Mask205, merge group, paste as a new layer.
8-Apply drop shadow, layers merge visible, save as a png. file. Done!!!
Any questions address them to me in here and I will respond as soon as possible.
Greetings, Alessa.
Translated by Silvia
Tutorial realizado con el hermoso Freebie Scrap LIFE IS BUT A DREAM de Scraps Dimensions,Doris Lynch, podeis encontrarlo AQUI
He utilizado una imagen de Elias Chatzoudis www.elias-design.gr podeis encontrar sus tubos en www.mypsptubes.com
Material adicional(máscaras)...AQUÍ
Comenzamos¡¡
1- Abrimos una imagen de 700x700 donde pegaremos el FRAME1 redimensionado a 600x600.
2- Abrimos el PAPER4 y le aplicamos la mascara WSL_mask181 y lo pegamos detras del marco como nueva capa.
3- Abrimos el PAPER5 lo pegamos como nueva capa detras de la mascara y borramos lo que sobre.
4- Abrimos el tube FLOWER2 redimensionamos y las vamos pegando igual que en el dibujo, igual con el lazo azul y borramos lo que sobresalga.
5- Pegamos como nueva capa el tube de la chica y el letrerito fusionamos capas y aplicamos sombra.
6- Abrimos el PAPER2 y le aplicamos la mascara WSL_Mask120 fusionamos grupo y lo pegamos como nueva capa detras del dibujo.
7- Con el mismo paper volvemos aplicar esta vez la mascara WSL_Mask205 fusionamos grupo y pegamos como nueva capa.
8- Aplicamos sombra, fusionamos capas visibles y guardamos como png. Listo¡¡
Cualquier duda o comentario dejadlo en esta entrada y os contestaré lo antes posible.
Saludos, Alessa.

Tutorial done with the beautiful scrap FTU A BIT GROOVY, from Scraps Dimensions, Doris Lynch, you can find HERE
I have used an image from ©Capuccino-Girl www.capuccino-girl.deviantart.com
Plugins Eye Candy 3.1 Drop Shadow and Color Raver/Atmospherizer
To download the tube and material click HERE
Start:
1-Open an image 600x600, paste Frame3 as a new layer.
2-Paste as a new layer tube lee-tex, erase what is left over (see finished image) and apply Color Rave filter with the values you like.
3-Paste as a new layer the doodli and erasing exactly like the drawing so that you can see it inside and out.
4-Open FRAME2 and paste as you see in the drawing.
5-Open PENDANT3 and paste as a new layer, open also tube EYELET RIBBON3 resize and paste as a new layer.
6-Open the orange flowers and yellow ones, paste them as in the drawing. Once placed layers merge visible, apply filter Eye Candy 3.1/Drop Shadow and give it shadow.
7-Resize the girl tube and paste, apply shadow.
8-Open tube PENDANT2 with the selection tool cut out the white and blue small balls and resize, paste into the handkerchief on the girl.
9-Layers/Duplicate/image/mirror and paste the small green flower.
10-Open and paste tube Mariel, layers merge visible.
11-Open PAPER3 apply the mask, paste as a new layer, apply drop shadow.
12-Export as a PNG file. Done!!!!
Any questions feel free to leave a comment I will respond as soon as possible.
Greetings, Alessa
Translated by Silvia
Tutorial realizado con el hermoso scrap FTU A BIT GROOVY de Scraps Dimensions, Doris Lynch, podeis encontrarlo AQUI
He utilizado una imagen de ©Capuccino-Girl www.capuccino-girl.deviantart.com
Plugins Eye candy 3.1 Drop sshadow y Color rave/Atmospherizer
Para descargar el tubo y materiales adicionales... AQUÍ
Comenzamos¡¡¡
1- Abrimos un paño de 600x600 y pegamos el FRAME3 como nueva capa.
2- Pegamos como nueva capa el tube lee-tex, borramos lo que sobre (ver imagen final) y le aplicamos el filtro Colorrave con los valores que mas os gusten.
3- Pegamos como nueva capa el doodli y vamos borrando como esta en el dibujo para que se vea por dentro y fuera.
4- Abrimos el FRAME2 y lo pegamos como esta en el dibujo.
5- Abrimos el PENDANT3 y lo pegamos como nueva capa abrimos tambien el tube EYELET RIBBON3 lo redimensionamos y pegamos como nueva capa.
6- Abrimos las flores naranja y amarilla y las vamos pegando como esta en el dibujo.Una vez pegadas fusionamos capas y aplicamos el filtro eye candy3.1/Drop Sadow para dar sombra
7- Pegamos el tube de la chica redimensionado y aplicamos sombra.
8- Abrimos el tube PENDANT2 con la herramienta de seleccion cortamos las bolitas blancas y azules las redimensionamos y las pegamos en el pañuelo de la cabeza de la chica.
9- Capas/duplicar/imagen/espejo y le colocamos la florecita verde.
10- Abrimos y pegamos el tube de Mariel y fusionamos capas.
11- Abrimos el PAPER3 y le aplicamos la mascara la pegamos como nueva capa y le aplicamos sombra.
12- Exportamos como png y listo¡¡
Cualquier duda dejadme un comentario y os atenderé lo antes posible.
Saludos, Alessa.

Tutorial done with the gorgeous scrap FTU Mustand Palette of Doris Lynch, you can find it HERE.
Thank you Doris.
I have used an image tube from Christina Strain http://www.ceeceeluvins.deviantart.com artist FTU you can download the tube HERE
Additional material HERE
The masks used are from VixPSP http://www.freewebs.com/vixpsp/masks.htm
Plugin necessary Eye Candy 3.1/Drop Shadow
Start:
1-Open PAPER3 and apply the mask Vix256, merge group and paste as a new layer in a new image 700x700, apply the filter Eye Candy 3.1 with values of 10-10-65
2-Open PAPER and paste as a new layer behind the frame, use the eraser tool, erase what is left over
3-Open the tube Garuplate, go to selections/select all/float copy the paper3 and paste into the selection, selections none, paste as a new layer under the frame
4-With the same tube repeat step 3, but this time copy paper2 and paste in the selection, resize width to 600px, paste below the first one
5-Open a small image and fill with the paper3 and apply the feather mask, go to layers/new mask layer/from image, paste as a new layer the same as the image, totate 45 dregrees to the right. Layers/ duplicate/image/mirror
6-Open a small image, same step as above apply mask Vix192 and paste it in the frame, duplicate 3 times place it the same
7-Resize the bow and the flowers and paste as a new layer, see drawing
8-Paste the girl tube, merge visible, apply the filter
9-Open paper2 and apply mask Shimmer, merge group. Paste as a new layer behind the frame, layers/duplicate/image/mirror
10-Layers merge visible apply the filter. Done!!!
I hope you enjoyed this tutorial
Greetings!!!!!!!!!!!!!!!!Alessa.
Translated by Silvia
Tutorial realizado con el hermoso scrap FTU Mustand Palette de Doris Lynch podeis encontrarlo AQUI.
Gracias Doris
He utilizado una imagen de Christina Strain http://www.ceeceeluvins.deviantart.com artista FTU podeis descargar el tubo AQUI
Material adicional AQUI
Las mascaras utilizadas son de VixPSP http://www.freewebs.com/vixpsp/masks.htm
plugins necesarios eye andy 3.1/ drop shadow
Comenzamos
1- Abrimos el PAPER3 y le aplicamos la mascara Vix256 fusionamos grupo y pegmos como nueva capa en un paño nuevo de 700x700 aplicamos el filtro con lo valores 10-10-65
2- Abrimos el PAPER y lo pegamos como nueva capa detras del marco, borramos lo que sobre
3- Abrimos el tube Garuplate vamos a Selecciones/seleccionar todo/flotar copiamos el paper3 y lo pegamos en la seleccion, quitar seleccion y lo pegamos como nueva capa debajo del marco
4- Con el mismo tube hacemos igual que en el paso 3 pero esta vez copiamos el paper2 y lo pegamos en la seleccion le cambiamos el tamaño a 600px de ancho y lo pegamos debajo del primero
5-Abrimos un paño pequeño y lo rellenamos con el paper3 y le aplicamos la mascara de la pluma vamos a Capas /nueva capa de mascara/a partir de una imagen y la pegamos como nueva capa igual que en la imagen rotarla 45º a la derecha
Capas /duplicar/imagen/espejo
6- Abrimos otro paño pequeño igual que el paso anterior y le aplicamos la mascara vix192 y la pegamos en el marco duplicamos 3 veces y la colocamos igual
7- Redimensionamos el laz y las flores y los pegamos como nueva capa igual que en el dibujo
8- Pegamos el tube de la chica, fusionamos todo y pegamos el tubo de la chica aplicamos de nuevo el filtro
9- Abrimos el paper2 y le aplicamos la mascara Shimmer fusionamos grupo y lo pegamos como nueva capa detras del marco y vamos a Capas/duplicar/imagen/espejo
10- Fusionamos todo aplicamos el filtro y listo¡¡
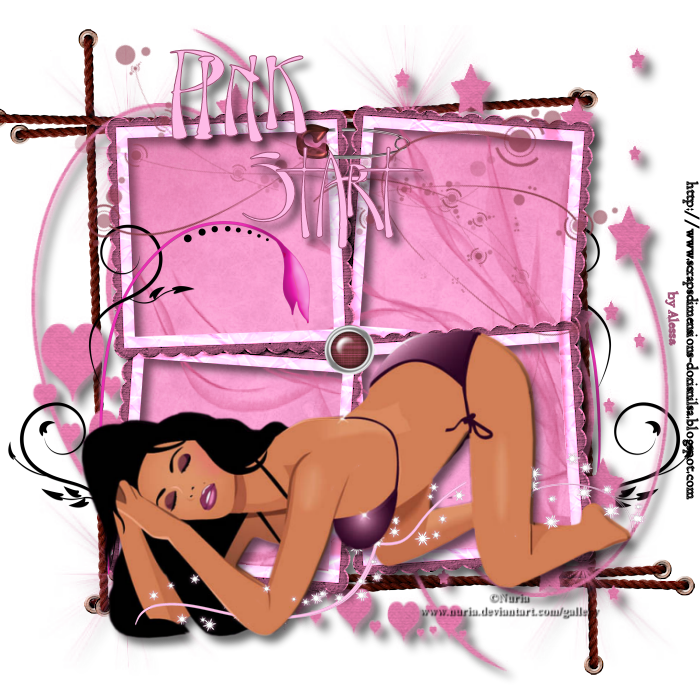
Tutorial done with the beautiful scrap DELIGHTFUL PINK of Doris Lynch, you can find it HERE. Thank you Doris.
I have used an image tube of NURIA www.deviantart.com/gallery FTU artist, you can download it HERE
Additional material HERE save the selection in your selections folder of your paint program
Plugin necessary Eye Candy 3.1 Drop Shadow
Start:
1-Open an image 700x700 and paste the frame resized at 600pixels in width, apply Eye Candy 3.1 drop shadow values: 10-10-65
2-Paste the paper13 as a new layer, behind the frame, erase what is left over, apply the mask claire-masque-fany, merge group
3-Paste the paper12 as a new layer behind and erase what is left over
4-Layer new raster layer/selections/load saved selection and apply claire-imagination, open paper14 copy and paste into the selection, selections/none, placing to our liking.
5-Open DOODLE2 resize to 400 pixels in height, paste as a new layer, the button the same way 60 pixels in height
6-Open the tube strings, resize 600 pixels in height and paste as a new layer, behind. Layers/duplicate/image/mirror/image/rotate
7-Paste the girl tube, apply drop shadow with the plugin with the same values.
8-Open the tube DOODLE1 paste as a new layer, erase what is left over
9-Open paper13 and apply the mask zuzzana, merge group, paste as a new layer, behind. Apply drop shadow
Layers merge visible. Done!!
Hugss, Alessa

Miembro de TWInc

Amigos


